pcnsd
Full Member
  
Posts: 113
|
Post by pcnsd on Dec 6, 2008 16:02:31 GMT -5
 I suffered a number of illusions at the start of this project, most have been shattered. The chief illusion was that I could build a seat for less than I could buy one. When all is done, this seat will cost about $100.00 more than a similar type seat can be purchased for. My guess for labor is about 30hrs when complete including seat foam and cover. The one belief that stands is you can make a seat that is exactly what you want (or very close to it.) and it will fit like it was made for your SR. I started by making the seat mount plate from alloy, it uses the factory mounts. Using polystyrene foam I attached strips and blocks of foam to the mount plate using spray contact adhesive and shaped with a hot knife and sandpaper until I had what I wanted. I covered the foam with reinforced packaging tape because the foam was so flimsy when shaped to final dimensions that it would not consistently maintain position and shape. I tape the interior first then sanded more on the exterior to thin further. I made the sides and front slightly longer than needed to offer a final trim to size after glassing and built a stand to support the form during the glassing process.    I built up 7 layers of 9 oz glass using an epoxy resin system and learned the hard way that not all glass is equal. The only glass to use for a project like this is a 2 x 2 twill weave. It has excellent form following capability, all other glass type including very light 3 oz glass will not lay flat to the form and leave air bubbles that weaken the structure and require additional labor to deal with. With each layup series (I did 2 layers at a time, then one final layer) it is necessary to sand the form to smooth out high spots.   After the final layer is hard and sanded, (I should note here that all sanding to this point was done with 60 or 80 grit paper.) I put on two coats of an epoxy/microsphere mixture, sanding between coats to fill the weave and then a final brushed on coat of epoxy and sanded again. (In these fill coats is where I transitioned from course paper to a final sanding with 220 grit in preparation for paint).  I used acetone initially to dissolve the foam from the form and strip the tape. It worked, but not well. I switch to xylene (replacement for toluene in the US) and it worked great. (Messy bit of work by the way) After that it was trim to final shape and the usual paint work. I still need to attach the fiberglass to the alloy plate and finish the seat foam and cover. The seat cover style will be similar to Marlon’s seat cover with attaching snaps.    Mistakes I made in hindsight: 1. Believing it would be easy. 2. Not using 2 x 2 twill cloth at the start 3. The seat has raised sections along the sides of the seat for added strength. They are unneeded, complicate fitting the seat foam and I suspect I will be able to feel them through the seat foam on completion. Flat with a large radius transition to the edge is better. 4. Symmetricity from centerline is close, but not perfect. I considered making cardboard cutouts to help in shaping, if I had a "do-over" I would add this step. What I like: 1. This is very close to what I wanted and the fit is near perfect. 2. 7 layers of fiberglass is very strong, stiff and light weight (17 oz without the mount plate, seat foam and cover) If you have any questions feel free to ask. Regards, PC |
|
|
|
Post by solo2racr on Dec 6, 2008 17:38:38 GMT -5
Looks great. Looks as though it was very well thought out on the design. For anyone else looking to do a similar thing, I suggest getting the book "Fiberglass & Composite Materials" by Forbes Aird and published by HPBooks. I got this book a few years back and is very good. It covers fiberglass, carbon fiber, Kevlar, prepregs, wet layup, mold making, vacuum bagging, epoxy resin, polyester and vinylester resins, gelcotes, and a bunch of other stuff. Well worth the $17.95. Although, I'm sure one could get it from Amazon.com cheaper.
|
|
|
|
Post by pablosrfivehundred on Dec 6, 2008 19:20:15 GMT -5
how does the alloy pan stay attached to the fiberglass?
|
|
pcnsd
Full Member
  
Posts: 113
|
Post by pcnsd on Dec 6, 2008 20:17:38 GMT -5
how does the alloy pan stay attached to the fiberglass? It is not yet attached. I am reviewing 3 options. 1. Bead blast the mating surfaces and use an high performance epoxy adhesive system. 2. Drill and bolt using 8, 1/4" diameter sex bolts of the appropriate length. 3. Drill and rivet using 24, AN470AD 5-? brazier head aluminum rivets. This will require a small alloy washer under the rivet head on the fiberglass side. I am torn between # 1 and 3 as to which will give the best service and leaning to # 3 because of my past life as a airframe mechanic. PC |
|
|
|
Post by solo2racr on Dec 6, 2008 20:34:17 GMT -5
I am torn between # 1 and 3 as to which will give the best service and leaning to # 3 because of my past life as a airframe mechanic. PC Not being sure of the frequency of the vibes on a aircraft but have some idea what they are like on an SR though, I think I would combine #1 and #3. About a 1"- 2" circle around the area of the rivet. I can just see between the vibes of the engine and the flex from the weight of your arse ;D placing alot of sheer load on the rivet and transferring to the 'glass to oval the hole out. I think you see where I'm going with this. |
|
pcnsd
Full Member
  
Posts: 113
|
Post by pcnsd on Dec 6, 2008 20:53:15 GMT -5
I think I would combine #1 and #3. I like the way you think. That is an excellent idea. Thanks for your suggestion. PC |
|
THUMPS
Junior Member
  THUMPS, ridden by Dave
Posts: 92
|
Post by THUMPS on Dec 6, 2008 22:11:59 GMT -5
Nice seat base. The entire seat weighs in at 17oz that is great.
Hopefully seeing your work will motivate me to work on my seat. I have the base and rear cowl shaped but not joined.
I have been bringing parts of my SR indoors from the unheated garage. I have been working on wiring or dewiring as it may be.
Hoping for warmer weather.
|
|
|
|
Post by colinjay on Dec 7, 2008 3:49:23 GMT -5
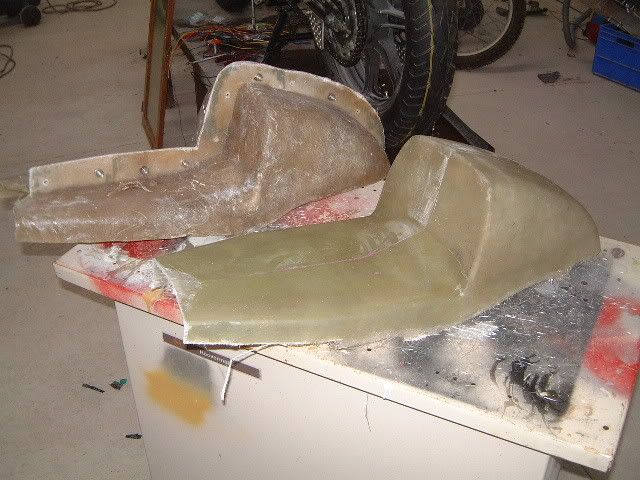
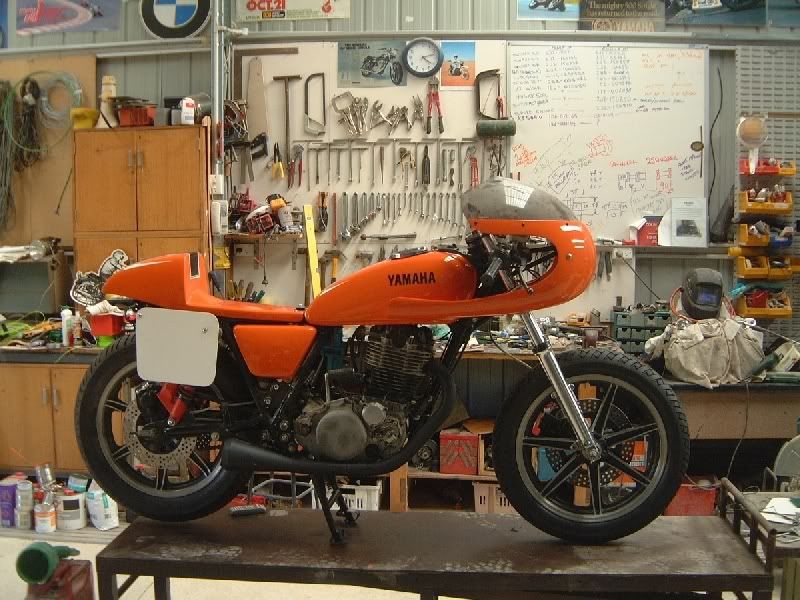
Well done, its a good looking seat. Also welcome to the wonderfull world of making you own custom parts. It might be a pain in the arse, but I think the the look and coments that you get from others when thay ask where you bought something, and you tell them that you designed and made it yourself, far out way the the pain and hardwork involved. Below are a couple of pics of the seat I made for my racer last year. I took the hard route, making a plug (buck) then taking a mould from the plug and finally laying up the seat in the mould. I didn't keep track of how muck material was used nor how long it took, but it filled in quite a lot of my spare time over 3 - 4 months, but I would have a guess at something like 50 - 60 hours of time went into the finished seat 1. The raw seat and the mould.  2. The finished seat on the bike.  I must be a glutton for punishment as I an in the process of designing a new more streamlined seat and fairing combination that should push the limits of the DLRA Partially Streamlined rules as far as posible without actually breaking them. I estimate that I will probably take me at least a couple of hundred hours, spead over the most of next year to make the plugs and moulds. But I am not in any hurry and my time is free. CJ |
|
pcnsd
Full Member
  
Posts: 113
|
Post by pcnsd on Dec 8, 2008 21:41:15 GMT -5
Nice work Colinjay.  I considered making a plug and mold, it is much more work but decided I only wanted the one off seat. If this one gets hammered, I will make another slightly modified based on what I've learned from the first. If it is good enough I can pull a mold from it for future use. PC |
|


 I considered making a plug and mold, it is much more work but decided I only wanted the one off seat. If this one gets hammered, I will make another slightly modified based on what I've learned from the first. If it is good enough I can pull a mold from it for future use.